Amazon Cloudwatch monitoring services are very handy to gain insight into your application metrics, besides metrics and alarms you can use this to go through your application logs without logging into your server and tail the logs.
I ran into few issues when I was initially setting up Cloudwatch for my custom logs in the Elastic Beanstalk Tomcat Application. I will walk you through the whole process on this blog.
Setting up your application
In this example, I am using a Spring boot Application which will be deployed in ElasticBeanstalk Tomcat container.
.ebextension file
First, you need to create a .ebextention file for your application
Here is a working sample of the .ebextension file
files:
"/etc/awslogs/config/mycustom.conf" :
mode: "060606"
owner: root
group: root
content: |
[/var/log/tomcat8/mycustomlog.log]
log_group_name = `{"Fn::Join":["/", ["/aws/elasticbeanstalk", { "Ref":"AWSEBEnvironmentName" }, "var/log/tomcat8/mycustomlog.log"]]}`
log_stream_name = {instance_id}
file =/var/log/tomcat8/mycustomlog.log*
The above configuration will create a custom configuration to copy logs from /var/log/tomcat8/mycustomlog.log to a log group named for my application and will copy over all the logs with the pattern mycustomlog.log
This line creates a configuration file mycustom.conf in the /etc/awslogs/config/mycustom.conf location. Once deployed you can SSH to this location to view your configuration.
files:
"/etc/awslogs/config/mycustom.conf" :
The following lines create the log groups and create the scripts to copy over the files to cloudwatch
content: |
[/var/log/tomcat8/mycustomlog.log]
log_group_name = `{"Fn::Join":["/", ["/aws/elasticbeanstalk", { "Ref":"AWSEBEnvironmentName" }, "var/log/tomcat8/mycustomlog.log"]]}`
log_stream_name = {instance_id}
file =/var/log/tomcat8/mycustomlog.log*
Make sure that you check your .ebextension is a valid yaml before deploying this to your application environment. I use http://www.yamllint.com/ to check the validity of my YAML’s
Place your .ebextension file in the /src/main/resources/ebextensions/ folder of your project

Gradle Script
Now you need to update your Gradle scripts to make sure that you package your .ebextnsion file along with your war file
Update your Gradle Script to include the ebextension in the root of the file
war {
       from('src/main/resources/ebextensions') {
       into " .ebextensions";
   }
}
With this gradle script, your war file should have a .ebextensions folder in the root and should have the mycustom.conf file in it.
Now let’s prepare your Elastic Beanstalk to enable the cloudwatch
Prepping up your Elastic Beanstalk Environment
To enable Cloudwatch for Elastic Beanstalk you need the following
- Permission for Elastic Beanstalk to create log group and log stream
- Enable the Cloudwatch on the Elastic Beanstalk application
Login to your AWS Account, go to IAM and create a new Policy similar to the following
Grant Permission to Elastic Beanstalk
{
    "Version": "2012-10-17",
    "Statement": [
        {
            "Sid": "CloudWatchLogsAccess",
            "Action": [
                "logs:CreateExportTask",
                "logs:CreateLogGroup",
                "logs:CreateLogStream",
                "logs:DescribeDestinations",
                "logs:DescribeExportTasks",
                "logs:DescribeLogGroups",
                "logs:FilterLogEvents",
                "logs:PutDestination",
                "logs:PutDestinationPolicy",
                "logs:PutLogEvents",
                "logs:PutMetricFilter"
            ],
            "Effect": "Allow",
            "Resource": [
                "arn:aws:logs:*:*:log-group:*"
            ]
        }
    ]
}
Now attach this policy to “aws-elasticbeanstalk-ec2-role”
Enable CloudStream on your Elastic Beanstalk application
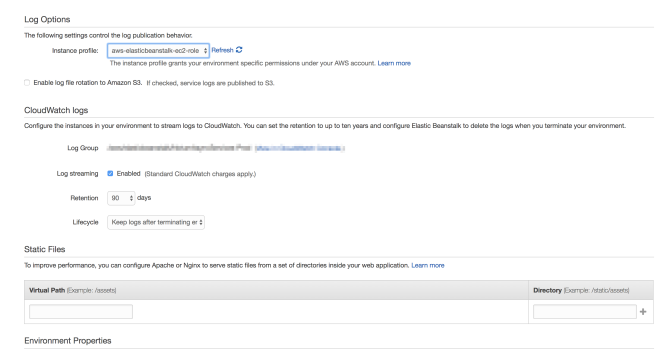
Go to your Elastic Beanstalk Application, Edit Software Configuration in the Configuration Menu

Enable Cloudwatch Logs from the settings

Once you do this the AWS will re-configure the system, now you deploy the war file created from the Gradle script.
Usually, AWS picks up the configuration after you deploy the new war file. if not restart the environment.
Go to the cloudwatch to verify your log stream
Troubleshooting Tips
As I said before I had issues while I was setting this up, if your configurations are not getting picked up go ahead with the following steps to troubleshoot this issue
- Make sure that your YAML is valid.
- SSH into the Environment and make sure that the file created in the location /etc/awslogs/config/mycustom.conf is valid.
- Check eb-publish-logs.log to see if it has any errors
- Finally, if nothing works rebuild your environment.

You must be logged in to post a comment.